Sunday 8 December 2013

Kymberly Redmonds Apple Pie


 I'm normally not one for social media, my humble blog is about as much publicity that I can muster, and despite the buzz of twitter and facebook I find myself lazily retreating away back into my lovely little kitchen..... there is one exception of course, I have become in instagram addict, purely because I get so much inspiration from fellow bloggers and foodies, this is why I loving living in a day and age when amazing recipes are so very accessible, you do not have to have a television show or a cook book to share an amazing recipe with the world. I Stumbled across a food blogger called "my mommas hands" ,this is a pretty amazing blog run by a very clever Canadian cook called Kymberly Redmond, wow that was a tongue twister!! Her style of food and ethos is very similar to mine, she too is willing to go to the ends of the earth to produce great food, even if the process takes days to get there, authenticity and patience is the key. I did find one particular recipe that stood out to me, she blogs about her old fashioned deep dish apple pie, those of you that regularly read my blog will know about my husbands affinity with apples, I thought that would be a good starting point. I have made many many apple pies before but this recipe was very different, I have been used to the English understated version, very simple and straight forward, a moderate amount of apples and a butter crust, I have also made a few experimental pies that where clearly no good as they have never made it onto the blog, but this apple pie is just perfection, the quintessential picture book apple pie. What is so different about this pie? the crust is made with vegetable shortening which produces an insanely crisp crust, there is tree's worth of apples in the pie, and the spicing is really key, Kymberly States that she likes her pie really cinnamony and gives you permission to use less if you desire, but I'm saying you can't use less, use the amount stated because she is spot on, any less and it would be pointless. I have converted the crust ingredients to grams for all you Brits and Kymberly states to use ginger crisp apples or Granny smith, I could not find ginger crisp apple over here so I have gone with the granny smiths. This is an amazing pie recipe and I'm really very excited to share it with you all because I know that from now on it will be the go to apple pie recipe. Well done Kymberly.

www.mymommashands.com
Old Fashioned Deep Dish Apple Pie (Filling)
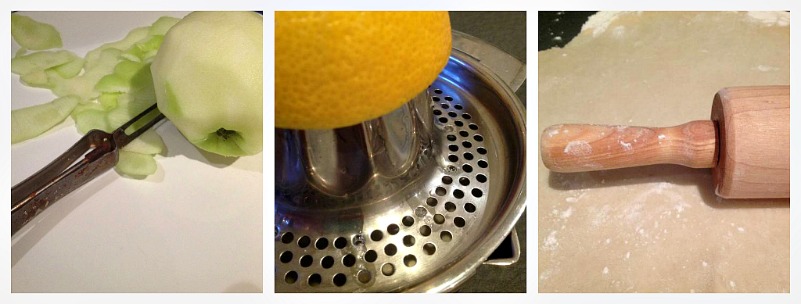
  • 5 1/2 pounds of Granny smith appled, peeled cored and sliced into half inch slices
  • 1 large lemon juiced
  • 1/2 cup of brown sugar
  • 1/2 cup of white sugar
  • 1/2 tsp of salt
  • 3 tbsp of flour
  • 1 tbsp of ground cinnamon
  • 1 tsp of ginger powder
  • 1/4 tsp of freshly grated nutmeg
  • 3 tbsp of butter cut into small pieces
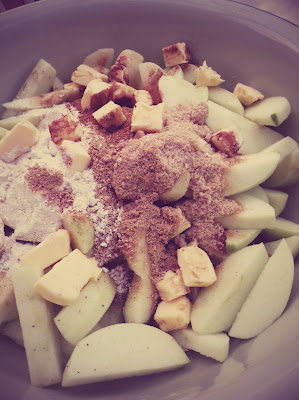
Mix together all of the filling ingredients together in a bowl ready to fill the pie crust, make sure the spices and flour are evenly distributed amongst the apples.

For the crust:
  • 600g of plain flour 
  • 265g of trex vegetable shortening
  • 3 tbsp of sugar
  • 2 tsp of salt
  • 1 egg
  • 100ml of cold water
Preheat the oven to 190 degrees c.
Grease a very large pie dish, roughly 30cm, with trex.
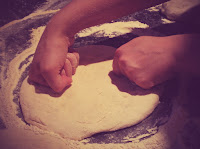
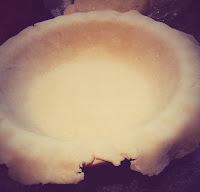
Place the flour, sugar, salt and trex into a bowl and using a pastry cutter cut the shortening together until it is the size of small peas, this can also be done in the food processor on pulse. Add the egg and the cold water and mix until it starts to come together, do not overwork the dough as it will become tough.
Roll out half of the dough until 1/8 inch thick to form the base, making sure it overlaps the edge of the pie dish by at least an inch, this is to allow you to crimp the edges of the pie crust.
Fill the pie dish with the filling and then brush a little egg wash around the rim of the pastry bottom so that when you place the lid onto the pie it will nip together. Roll out the other half of the pastry to 1/8 inch thick and allow for at least an inch overlap all the way around. 


Press the edges together and trim the excess pastry, you can nip the edges of the pastry together using a fork or a traditional crimping method, decorate the pie with any excess pastry before egg washing with egg whites, sprinkle the top with a little coarse sugar for crunch and texture, cut a few holes in the top of the pie to let the steam out.
Bake in the oven for 50-60 minutes until the sugar begins to bubble out of the top of the pie crust.


Tuesday 26 November 2013

The perfect apple crumble


 As I have mentioned many MANY times before my husband has such a terrible sweet tooth, you name it, if it has sugar in he will eat it, he has even been known to dessert hunt in the early hours in the morning, rummaging in the fridge Nigella style! Thankfully for my husband he has a super speedy metabolism, and no matter how much cake and pudding he consumes he never gains an onze. My husbands favourite dessert is usually anything to do with apples, he is a total pomme junkie! When he wants me to make him a dessert he has a particular strategy, he mentions either his mothers or grandmothers desserts, this is so that subliminally it gets in my head, and being the super competitive person I am, I then make it my life's mission to test recipe after recipe until I come up with what I consider the holy grail classic!
 Now here is the science to this recipe, bake the crumble or crisp topping (depending on which part of the world you are from) separately, guaranteed crumble perfection, crisp crumble and soft fruit! You can adapt the fruit to your preference of course but I think half the quantity of tart cooking apples to half firm super sweet apples makes for the ultimate flavour and texture sensation.
 It is not very often my husband is silent, but there was no time for talking whilst he wolfed down this pudding!

For the filling:
250g of pink lady apples, peeled, cored and sliced
250g of Bramley apples, peeled, cored and sliced
100g caster sugar
100g brown sugar
1 tsp almond extract
The zest of an orange
The juice of half an orange
The juice of a lemon
1 tsp of cinnamon
1/4 tsp of  freshly grated nutmeg
50g butter

For the crumble:
75g rolled oats
250g of flour
150g of butter
75g caster sugar
1 tsp cinnamon
1/2 tsp Maldon salt

Preheat the oven to 180 degrees c
Butter a 20cm by 15cm pie dish. (Zest the orange first as a juiced orange is impossible to zest. Peel, core and slice the apples place them in a bowl and toss them immediately in the citrus juices. Add all of the rest of filling ingredients apart from the butter and then toss well so the flavouring are well distributed. Place a sheet of grease proof, then tin foil over the baking dish and then bake the apples for 25-30 minutes until some of the apples are soft and some are broken down.
 Meanwhile to make the crumble: add the butter, flour and sugar into a bowl and rub the fat into the dry ingredients using your finger tips, this process should continue until it begins to resemble rough sand.
 Finally add the salt, cinnamon and oats, give the crumble a final toss, I like to pinch the dough to make larger chunks of crumble but the is purely preference. Decant the crumble into a lined baking sheet and then cook for 20 - 25 minutes at the same temperature as the filling, be aware that you must toss the crumble topping for even coloration. Once the crumble topping and fruit filling are ready, decant the crumble on top of the fruit, sprinkle a tablespoon of Demerara sugar onto the crumble top for added crunch! If cooking this from cooled I suggest it will need 20-25 minutes to heat through, but is you are cooking this immediately it will only take ten minutes! Serve with custard, it's the law!


Monday 25 November 2013

Lemon and poppy seed cake


 I hate to quote the words of the Fresh Prince of Bel air but...... this is a story all about how I became unhealthily obsessed with a cake. For those of you who know me personally will know that I do not do cake, I know it is hard to believe because I make them all the bloomin' time, but I assure you if I had an enormous piece of chocolate cake and a plate of cheese and crackers in front of me I would take the cheese and crackers every single time. However once in a while something comes along that makes you a believer, brings meaning to the word "cake" and makes you long so hard for the crumbly goodness that you are willing to make a cake pilgrimage for over an hour just to have one sweet indulgent moment, and in that moment I understand all my husbands cake-a-betic needs. 
 This cake was originally made in a Leeds based Deli called "Salts", I have to admit that I didn't actually buy it for myself, but as the minutes ticked by and I swear the cake began to talk to me, I tore off a small crumb, not too much because this was after all someone else's cake, I flicked the crumb into my mouth and it was like an LSD moment, the whole world danced and spun around me and all I could see was a lemony hue of cakey loveliness, that was when I decided I didn't much like the person I had bought the cake for anyway and I wolfed it down, besides the love affair with Salts Lemon drizzle cake lasted longer and brought me more happiness anyway. The thing is, it is almost sticky, moist, tart but not to tart, just how it should be. When I met my husband I introduced him to my other love of my life and despite my husband not being the biggest fan of citrus he absolutely adored it. Then a couple of years ago the world came crashing down on me and life  stopped making sense, SALTS HAS CEASED! So that was it, do I live with my love as a distant memory or do I figure out this recipe once and for all? It has taken countless batches of lemon cake, sometimes I wanted to throw the towel in but i'm glad I didn't because this recipe is the S***! Lemon Lovers enjoy!

Lemon Drizzle Cake

150g softened butter
200g caster sugar
100g golden marzipan
100g ground almonds
2 tsp of lemon extract
1 tsp of almond extract
1 tsp vanilla extract
the zest of two large unwaxed lemons
150g self raising flour
1 tbsp poppy seeds
1 tsp baking powder
1/2 tsp salt
3 eggs
For the topping:
200g icing sugar
Juice of two lemons
1 tsp of lemon extract
2 tsp of poppy seeds


Preheat the oven to 180 degrees c. Either grease and line a 20cm by 20cm cake tin or use a silicone mould as shown.
Cream together the softened butter and sugar, this can be done with a hand whisk. Add the vanilla and marzipan, the whisks will break down the marzipan but you will need a little patience, add the eggs whisking in one at a time, add the almonds, salt, poppy seeds, lemon extract, vanilla extract and almond extract. Finally sieve in the flour and baking powder and fold in until just combined. Decant the mixture into your chosen baking tin and cook for 25-30 minutes or until you can insert a skewer into the middle and it comes out clean, set aside and allow to cool.
Meanwhile mix the lemon juice, extract and icing sugar together until smooth, spoon onto the cooled cake and then top with the poppy seeds.

Sunday 3 November 2013

Swedish fish gratäng (Swedish Fish Pie)


My very Swedish mother has had, and always will have a vendetta against all ready meals, she would swiftly walk past the frozen meal section uttering expletives under her breath, but bizarrely despite her huge hatred for all things pre-packaged she had a weakness, a chink in her scratch cooked armour.... Fisk Gratang, not just any Fisk Gratang, FINDUS fisk gratang. I know exactly what you are thinking, and believe me I questioned her motives many times, but even I have to say it is the one ready meal that is absolutely delicious. 
 Like I have mentioned before, as a child my mother would use me as her Swedish food mule, her suitcase would be filled with our clothes and my suitcase would be filled to the brim with Swedish food, you name it we had it, and believe me we always and I mean ALWAYS had fisk Gratang. So you can only imagine my mothers joy when in the late 90's her Swedish friend called to alert her that Findus had started to sell fisk Grantang in Sainsbury's supermarket, my mother hot wheeled the car so fast and literally filled up a trolley with every pack of the fisk gratang that the freezer could hold, she even asked if they had any more in the back. 
 Sadly the Fisk Gratang gravy train had to stop sometime, and despite my mothers efforts to double Findus's sales, narrowly bankrupting my father in the process, they stopped selling it, and my mother went back to muttering expletives in the frozen ready meal section. This is why I have spent a long time trying to re-create the exact Fisk Gratang just how my mother remembers it.
 This is a version of a fish pie, but it is much much lighter despite the copious amounts of double cream, it is easier to make than a British fish pie, and I'm sorry I have to say it, it is far far better. 
 Once you try this Swedish Fish Gratin I fear that you may actually turn your back on the humble British fish Pie, so don't Say I didn't tell you so!!! I recently cooked this recipe for my mother, I think I saw a tear in her eye when she tasted it, job well done I think.

For the fish stock:
The prawn peelings from the 200g of north atlantic cooked prawns
1 tsp salt
187ml bottle white wine
300ml fish stock (water with two know fish stock pots)
A few fennel sprigs
1large shallot
10 white pepper corns


To finish the sauce:

300ml of the fish stock that we made earlier
50g butter, flour
200ml milk
225ml double cream
3/4 tsp salt
25g chopped dill
2tsp mustard
20 ml lemon juice
1/4 tsp lemon zest
1 tsp mild paprika

Duchess potatoes:
3 very large potatoes
150g of butter
100ml of milk
100ml of double cream
1 tsp Maldon sea salt
4 egg yolks
1 tsp ground white pepper
1/2 tsp of freshly grated nutmeg

For the Filling:
500g cod loin
200g North atlantic prawns with the peel on

 Peel and cube the potatoes and boil them in well salted water until they are very tender.
 Meanwhile place all the stock items into a pot and reduce it down by a third, it is important that the peelings from the prawns including the heads are in the stock pot. Strain the stock through a sieve, you should have roughly 300ml of stock.
 In another pan start the sauce by melting the butter and flour together to create a rue, add the stock a little at a time, whisking as you go, it is just like making a white sauce, once the stock has been used up then add the milk and double cream, when the sauce is smooth add all of the other ingredients for the sauce, mustard, dill, lemon juice and zest, salt and paprika(for colour), whisk until smooth, set to one side.

 Next pass the potatoes through a potato ricer or mash them as finely as possible, place a pan on the heat and add the butter, milk and cream, then the potatoes, then the egg yolks one at a time, continue to mash or stir until the potatoes almost seem gluey. Finish with salt, pepper and the nutmeg. Place the potatoes into a large food piping bag with a large nozzle ready to decorate the pie.
 Butter a Medium sized pie dish, roughly 15cm by 20cm. Slice the Cod loin into inch thick slices and place the fish on one level, overlapping slightly, season with a little salt, then top with the peeled prawns, then the sauce.
Pipe the potato around the edges, making sure that a space in the middle is left uncovered.
Bake in the oven for 25-30 minutes at 180 degrees c until golden and bubbling. 


Kung Pao shrimp


  It is most unfortunate that the area I live in has quite frankly some of the most appalling places to eat, even the prospect of getting a takeaway (one of lives lazy pleasures) leaves me completely disheartened, although thoughts of being lazy and having a meal delivered to my door sounds most appealing, I'm faced with the reality that I would only feel disappointed and out of pocket. Maybe it is a blessing in disguise that I don't enjoy a takeaway, maybe it's high standards, maybe it is that I'm stubborn, I would rather cook something great than being given mediocre Knock off English version of Chinese food. Kung Pao is a sichuan Dish, I have made no secret of my love for sichuan food,it encompasses everything I love about food, the best part is that it is totally unapologetic about how hot the food is. 
 If you do not like spicy food, I suggest you look away now because this dish is only for those extreme heat lovers, the ones who get a kick out of a kick, and are dissatisfied unless they are sweating.

Do not even try to make a mild version of this dish, it would be like making a fish pie with beef, the heat has to be done, I did consider renaming my version of Kung pao "Ka-pow", but I know I would get many angry comments from the Sichuan Province so I think I will leave it as it is. I guarantee this will take less time than if you have chose, dial, order and have  your takeaway delivered, super fast and tastes 100% better than a rubbish takeaway.

For the sauce:
2 tbsp Kecap Manis
2 tsp black rice vinegar
3 tbsp of light soy sauce
2 tbsp of sugar
1 tbsp of honey
6 tbsp of water
1 1/2 tsp of corn flour
a large pinch of ground white pepper
a small pinch of sea salt
1 tsp sesame oil

For the Dish:
300g of peeled and deveined king prawns
2 sliced fresh red chillies
1 white onion cut in half and each half into six pieces
1 red pepper cut into large chunks
3/4 cut of whole salted cashew nuts
1 tbsp of sesame oil
1 tbsp of chao zhou chilli oil (with the bits in the bottom)
10 dried red chillies (rehydrated in hot water)
6 finely chopped large garlic cloves
4 tbsp of water

Start by getting ver prepared, make sure that all the vegetables are prepped and all the ingredients are measure, this just makes life easier because chinese food does not wait for anyone. Place all the sauce items into a bowl and stir until the cornflour has fully dissolved.
 Once this is all done it is time to cook. In a wok or heavy based pan add the oils, cashews, onion, pepper, chillies (both dried and fresh), cook until the onion soften slightly, you will now need the 4 tbsp of water to help retain the crunch in the vegetables, add the garlic and cook for a further 2 minutes before adding the bowl full of sauce, when the sauce starts to thicken add the prawns, when the prawns turn pink serve immediately, finish with a few sprigs of coriander for colour.


Jamie's chocolate and chestnut torte (done my way)


I saw this recipe in a Jamie Oliver Magazine and thought the combination of chestnut and chocolate sounded amazing, I thought it would be a great alternative to the usual christmas pudding. I tried out the recipe but didn't think it was quite right, it was a little too sweet and the filling was not thick enough, the original recipe called for 300g of sweetened chestnut puree but only 300g of dark chocolate and 300ml of double cream, which meant that it was very sweet and did not have a lovely bitter chocolate flavour, what's more is that a tin of sweetened chestnut puree is exactly 250g, I felt it was a little pointless to get another tin for 50g extra.
 I also wanted to make the recipe easier, the original recipe called for a sweet chocolate pastry base that is not super crisp, I thought a biscuit base would be far more suited and much easier for those who want to wow people with minimum fuss. I have to say that the filling was lovely and bitter which meant it was not as sickly as the original recipe. I think it was a great idea of Jamie's but had a few little glitches that I feel I have ironed out. Great recipe for Christmas day and will happily stay in the fridge for up to a week.

For the filling:
600g dark chocolate
600ml double cream
250g of sweetened chestnut spread

For the base:
300g Oreo biscuits crushed until very fine
100g butter


Top with four tablespoons of crushed honey comb


 Firstly grease and line the bottom of a 9 inch spring form cake tin. Blend the Oreo biscuits in a food processor until they resemble fine crumbs, melt the butter and add it to the crumbs, mix well until it is the texture of damp sand, push it into the tin until it creates a flat biscuit base. Place the tin into the fridge for half an hour to firm up the base.
 For the filling melt the chocolate either in a microwave on medium for 2-4 minutes stirring occasionally or over a bain marie. Whisk the cream and chestnut puree together until it is ad the soft peak stage, add the melted chocolate and mix until fully incorporated, decant the filling into the spring form cake tin, give it a sharp tap to eliminate air bubbles and place in the fridge for a couple of hours or overnight. To finish sprinkle with crushed honeycomb.


Wednesday 2 October 2013

Authentic Italian pizza, the way it should be


The misconceptions of authentic cuisines are rife in the uk, like the recipe magpies that we are, we borrow a great dish from a country in which their cuisine has made an impression on us, then we adapt it to our British palate, now in theory this may seem like a good idea at the time, but years after we have borrowed such dishes and now made them our own it means that the UK's top ten favourite foods now consist of tikka masala, stir fries, spaghetti bolognese and pizza sigh....
This is why I have decided to go back WAYYYY back, to the land where pizza originated, Italy, the one place where pizza remains the harmoniously humble meal it always has been, where the key is not too load hideous toppings of beef burgers, donner meat or an inch of melted plastic cheese, but it is all about the base and toppings are kept to a minimum, tomato, mozzarella and basil, the colours of the Italian flag. I know that we don't all have wood burning ovens in our back gardens, but there are ways to get around such obstacles, we can recreate culinary heaven. A lot of recipes that I have researched are very quick to do but by allowing your dough a little time to ferment the flavours of the dough develop significantly, some call for 72 hours of slow rising in the fridge but I have tried this and truly feel that you can get the same results by leaving the dough for eight hours at room temperature.Humour me if you will, I came, I tried and I think I conquered what is true and splendiferous about the great Italian pizza.

1kg 00 flour
2 tbsp Maldon salt, if it's table salt use half the quantity
6 tbsp of extra virgin olive oil
600ml lukewarm water
2 tsp dried fast action instant yeast
3 tsp sugar

Place the flour in a large bowl, electric mixer with a dough hook or pour it directly onto the work bench, add in the salt and mix the salt through the flour. In a jug measure out 600ml of blood temperature water, you should be able to dip your fingers into the water and not notice a temperature change. 

Add in the sugar and yeast and allow the yeast to dissolve, mix the water into the flour and salt, when you have a rough dough add the olive oil to the dough and then knead the dough for 10-15 minutes until the dough becomes elastic and stretchy, place the dough into a large container or into a bowl covered with cling film, let it rise for 8 hours at room temperature. 
 Meanwhile make the passata.

You will need:
6 large plum tomatoes
A tbsp of extra virgin olive oil
A tsp of Maldon salt

Place everything into a pan and cook the tomatoes until they break down entirely! Allow to cool.

Get your toppings ready.
For pizza neapolitana I have buffalo mozzarella that has been well and truly dried, fresh basil, grated pecorino (it's a personal preference I prefer it to Parmesan) and the passata.


N'duja pizza, this is my favourite, a few blobs of Calabrian chilli spiked n'duja sausage, fresh mozzarella, black olives, pecorino cheese and fresh basil.
The last pizza was a prawn and garlic pizza, king prawns, freshly chopped garlic, oregano, mozzarella and pecorino.

I know what you are thinking, how can you replicate the cooking of a wood burning pizza oven, you cannot replicate it but you can get very very close. Either use a cast iron flat grill, or turn a cast iron pan upside down, heat the oven as hot as it will go with the cast iron pan inside for at least half an hour.
This dough made six wonderful pizzas.
 When the dough has risen divide the dough into six, on a very floured surface with a handful of semolina in the flour to soak up the moisture, start by using your finger tips flatten the dough into a disc, you can then pick up the dough and rotate it letting gravity do it's work, it will stretch the dough but will still leave a lip around the edge.
 These pizzas must be thin, never thick, each dough ball should stretch to roughly 10-12 inches.
 Remove the cast iron pan from the oven and working quickly place the disc onto the pan, spread a thin layer of tomatoes, and then top with your choose toppings, no beef burgers or donner meat allowed! Cook the pizza in the Oven for 6-9 minutes until the base is crisp and the cheese has melted. Serve immediately.

Happy Little boy